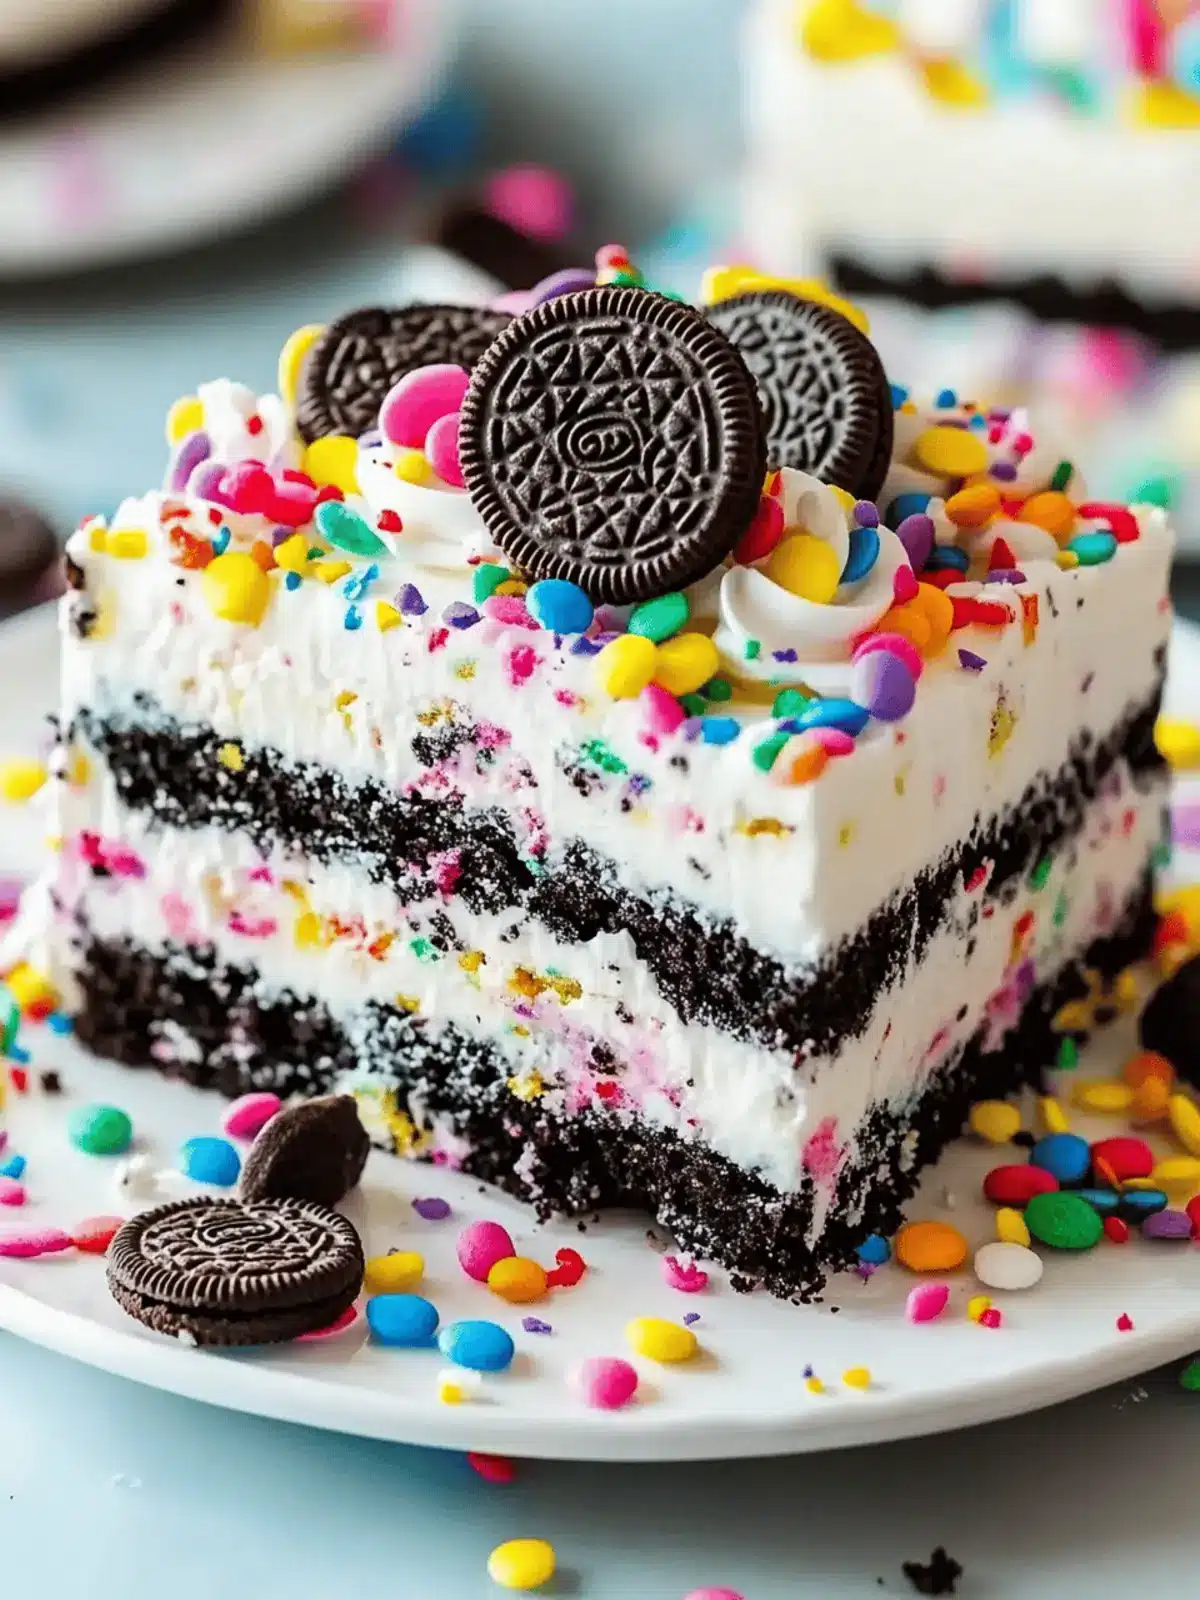
With the first hint of spring in the air, I found myself inspired to create something bright and fun for an impromptu gathering with friends. As the idea of a vibrant dessert danced in my mind, I couldn’t shake the nostalgic allure of those classic, colorful sprinkles. That’s when the No-Bake Funfetti Oreo Icebox Cake came to life! This delightful treat marries the rich chocolate goodness of Oreos with a light, creamy filling, making it perfect for any occasion—from birthdays to casual brunches.
The best part? It requires no baking at all! Layered with crunchy cookie crumbs and fluffy whipped topping, each slice delivers a delightful crunch and a burst of festive joy. With simple ingredients and the freedom to customize with your favorite Oreo flavors, this icebox cake is a surefire way to brighten up your dessert table. So, let’s dive into this easy recipe and whip up a cake that’s as effortless to make as it is delicious to eat!
Why is Funfetti Oreo Icebox Cake a Must-Try?
Endless Customization: This recipe offers the flexibility to switch up flavors with various Oreo varieties.
Effortless Preparation: No baking means you can whip this up in no time, perfect for last-minute gatherings.
Crowd-Pleaser: The colorful layers and festive sprinkles guarantee smiles all around.
Light and Creamy: Enjoy a luscious, airy texture that balances out the richness of the Oreos.
Make-Ahead Convenience: Prepare it a day in advance for a stress-free dessert option at your next event. Dive into making this delightful dessert that everyone will love!
Funfetti Oreo Icebox Cake Ingredients
• Ready to create this colorful treat? Let’s gather what you’ll need!
For the Base
- Oreos – A crunchy, chocolatey foundation; fresh cookies ensure the best texture.
For the Filling
- Cream Cheese (8 oz) – Provides richness and tang; remember to soften it for easy mixing.
- Whipped Topping (8 oz) – Delivers lightness and fluffiness; pre-made is quick and convenient.
- Powdered Sugar (1 cup) – Adds balanced sweetness; adjust for your preferred flavor intensity.
For the Topping
- Colored Sprinkles (½ cup) – Infuses fun and festivity; choose rainbow or themed sprinkles for occasions.
Now that you’ve got all these cheerful ingredients for your Funfetti Oreo Icebox Cake, let’s create something wonderful together!
How to Make Funfetti Oreo Icebox Cake
-
Gather all your ingredients to ensure a smooth preparation: crushed Oreos, softened cream cheese, whipped topping, powdered sugar, and the colorful sprinkles.
-
Crush the Oreos into fine crumbs using a food processor or place them in a zip-top bag and roll with a rolling pin. Set the crumb mixture aside for later layers.
-
Beat the softened cream cheese and powdered sugar together in a mixing bowl until the mixture is smooth and creamy; this should take about 2-3 minutes.
-
Fold in half of the whipped topping and half of the sprinkles gently until everything is well combined, creating a light, fluffy filling.
-
Layer half of the crushed Oreos in an 8-inch square baking dish, followed by half of the cream cheese mixture. Repeat these layers with the remaining ingredients, finishing with the cream cheese layer on top.
-
Cover the baking dish tightly with plastic wrap and refrigerate it for at least 4 hours; overnight is best to let the flavors meld beautifully.
-
Slice into squares once set, and serve with optional garnishes like whipped cream and extra sprinkles for that cheerful touch!
Optional: Drizzle with chocolate sauce for an indulgent flair.
Exact quantities are listed in the recipe card below.
Expert Tips for Funfetti Oreo Icebox Cake
-
Fresh Ingredients: Always use fresh Oreos and softened cream cheese to ensure the best texture and flavor in your Funfetti Oreo Icebox Cake.
-
Chill Time Matters: Allow the cake to refrigerate overnight if possible. This enhances the flavors and helps the layers set properly.
-
Avoid Overmixing: When folding in the whipped topping, do so gently and stop when you reach soft peaks to maintain a light and airy texture.
-
Customize it: Feel free to swap in different Oreo flavors or add in nuts for extra crunch in your filling, making each Funfetti Oreo Icebox Cake uniquely yours.
-
Tasting is Key: Adjust the powdered sugar based on your taste preferences to create a balanced sweetness that complements the richness of the Oreos.
-
Decorate with Style: Finish off your cake with additional sprinkles or a drizzle of chocolate for a beautiful presentation that makes it even more enticing.
How to Store and Freeze Funfetti Oreo Icebox Cake
Fridge: Store leftover slices in an airtight container in the refrigerator for up to 5 days. This keeps the cake fresh and maintains its delightful texture.
Freezer: You can freeze the entire cake or individual slices wrapped tightly in plastic wrap or foil for up to 2 months. Thaw in the fridge before serving.
Reheating: This cake is best enjoyed chilled, so there’s no need for reheating. Simply slice and serve straight from the fridge after thawing.
Make-Ahead Tip: Prepare the Funfetti Oreo Icebox Cake a day ahead to enhance the flavors, making it a perfect stress-free dessert for celebrations.
Funfetti Oreo Icebox Cake Variations
Feel free to let your creativity shine by customizing this delightful cake to suit your taste!
- Flavor Twist: Try using Birthday Cake Oreos instead for a festive, cake-flavored surprise.
- Nutty Crunch: Add chopped walnuts or pecans into the filling layer for extra crunch and flavor.
- Minty Fresh: Swap Mint Oreos in for a refreshing, chocolate-mint combo that will impress your guests.
- Chocolate Lover: Use Double Stuf Oreos for a richer, creamier texture that chocolate lovers will adore.
- Coconut Delight: Stir in coconut flakes into the filling for a tropical twist and chewy texture.
- Berry Burst: Layer in fresh strawberries or raspberries between the Oreo layers for a fruity zing.
- Spicy Kick: Add a sprinkle of cinnamon or a dash of cayenne pepper to the filling for a surprising heat.
- Zesty Infusion: Incorporate a hint of lemon zest in the whipped topping for a refreshing citrusy flavor.
With each variation, you’ll discover new layers of joy in your Funfetti Oreo Icebox Cake!
What to Serve with Funfetti Oreo Icebox Cake?
Creating a delightful meal doesn’t end with dessert; it’s about pairing flavors that complement each other beautifully.
-
Fresh Fruit Salad: A medley of seasonal fruits adds a refreshing balance to the rich creaminess of the cake, cleansing the palate perfectly.
-
Chocolate-Dipped Strawberries: The tartness of strawberries against the sweetness of chocolate creates a delightful contrast, enhancing the dessert’s festive vibe.
-
Vanilla Ice Cream: Classic vanilla ice cream adds a creamy element that pairs wonderfully with the crunchy layers, making each bite a rich delight.
-
Sparkling Lemonade: Bubbly and bright, this drink is refreshing and balances the sweetness of the cake while adding a citrusy zing.
-
Whipped Cream: Additional dollops of whipped cream provide a light, airy texture that beautifully complements the layers of the icebox cake.
-
Chocolate Sauce: Drizzling warm chocolate sauce over each serving takes this dessert experience up a notch, adding a luxurious finish.
-
Nuts and Chocolate Bark: A side of mixed nuts or chocolate bark introduces a satisfying crunch, enriching the texture and flavor profile of your dessert spread.
Let your imagination guide you as you create a delightful feast around this colorful Funfetti Oreo Icebox Cake!
Make Ahead Options
These No-Bake Funfetti Oreo Icebox Cakes are perfect for busy home cooks looking to save time without sacrificing flavor! You can prepare the entire cake up to 24 hours in advance, allowing it to chill in the refrigerator, which helps the layers set and flavors meld beautifully. For optimal quality, just make sure to cover it tightly with plastic wrap to prevent dryness. If you’re prepping in advance, assemble the cake as instructed and refrigerate. When it’s time to serve, simply slice it into squares and add any extra whipped cream or sprinkles on top for a festive touch. This way, you can enjoy celebratory moments with less hassle!
Funfetti Oreo Icebox Cake Recipe FAQs
What kind of Oreos should I use for the Funfetti Oreo Icebox Cake?
Absolutely, I recommend using fresh Oreos for the best texture and flavor. Stale cookies can lead to a soggy base, which isn’t what we want for this delightful dessert. You can experiment with various Oreo flavors like Birthday Cake, Mint, or even the classic chocolate to tailor the cake to your taste.
How should I store leftover Funfetti Oreo Icebox Cake after making it?
You can store leftover slices in an airtight container in the refrigerator for up to 5 days. This method keeps the cake fresh while maintaining its delightful, creamy texture. Just be sure to cover it well to prevent odors from other foods in the fridge.
Can I freeze Funfetti Oreo Icebox Cake? If so, how?
Yes! You can freeze the entire cake or individual slices. Wrap it tightly in plastic wrap or foil, and freeze for up to 2 months. When you’re ready to enjoy, thaw it in the fridge overnight. This way, the cake retains its creamy texture and flavors perfectly.
What if my whipped topping is too thin after mixing?
Very often, this happens if the whipped topping isn’t folded in gently or if it’s overmixed. To fix it, just add a bit more powdered sugar (start with a tablespoon at a time) to thicken it up. Ensure you’re folding rather than mixing vigorously to keep that lovely light texture!
Can I make the Funfetti Oreo Icebox Cake dairy-free?
Absolutely! For a dairy-free version, use a dairy-free cream cheese alternative and a non-dairy whipped topping. There are many great options available now that still give that wonderful creamy texture and delightful flavor without any dairy. Just check labels to ensure your Oreo cookies are also dairy-free, as some varieties may contain milk.
How important is the chilling time for the Funfetti Oreo Icebox Cake?
Very important! Chilling the cake for at least 4 hours—or preferably overnight—allows the flavors to meld beautifully and the layers to set properly. This step enhances the taste and texture, making each slice a thrilling surprise of creamy goodness and crunchy cookies. Remember, patience is key for the best result!

Colorful Funfetti Oreo Icebox Cake for Effortless Celebrations
Ingredients
Equipment
Method
- Gather all your ingredients: crushed Oreos, softened cream cheese, whipped topping, powdered sugar, and colored sprinkles.
- Crush the Oreos into fine crumbs and set the mixture aside.
- Beat the softened cream cheese and powdered sugar until smooth and creamy.
- Fold in half of the whipped topping and half of the sprinkles until well combined.
- Layer half of the crushed Oreos in an 8-inch square baking dish, followed by half of the cream cheese mixture. Repeat these layers, finishing with the cream cheese layer on top.
- Cover the baking dish with plastic wrap and refrigerate for at least 4 hours or overnight.
- Slice into squares and serve with whipped cream and extra sprinkles.


